Several inspection standards which cover the maintenance of large assets frequently state that a relatively small collection of sparsely separated spot measurements is needed to estimate the interval until the next inspection or the asset’s remaining life. Inspecting these large assets can be very time consuming leading to the inspector and asset owner striking a balance between the time available to conduct the inspection and the level of measurements required to determine its condition. By simple approximation, some guidelines recommended a number of 10 millimeter2 spot measurements on a 15 meter (49 feet) high shell wall of a storage tank 50 m (164 ft) in diameter would cover approximately 0.0012% of its surface; as the saying goes, like finding a needle in a haystack. Coupled with hazards from rope access or increased costs with scaffolding access to elevated areas, the inspections are challenging, to say the least.
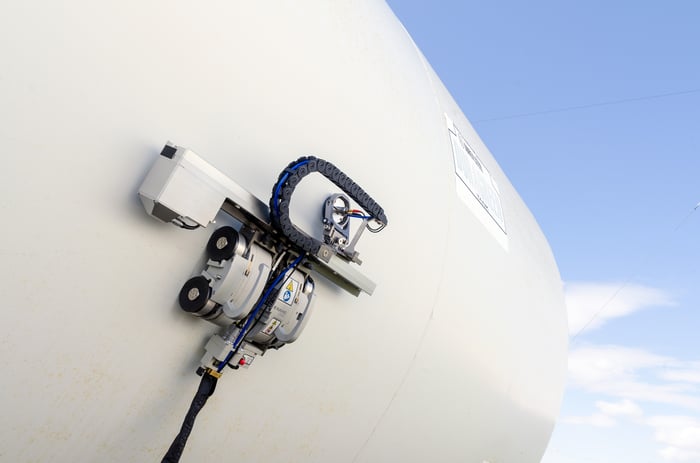
The automated solution from Eddyfi Technologies is a battery operated remotely controllable crawler for corrosion mapping that can perform this task by creating a 2D color coded map of measurements. The robust and field proven crawler uses magnetic wheels for adhesion and can climb surfaces orientated in any direction. Positional accuracy of the corrosion map is achieved with a fixed scanning rail (raster arm) with its weight evenly distributed onto two separate tractor modules that run in tandem to reduce the risk of the scanner veering off course. With a range of raster arm widths from 300 to 1160 mm (12 to 45.6 inches), corrosion maps created can then be stitched together — using our Capture™ and Ultravision® software platforms for a merged view of individual scans to assist with the analysis of the asset condition.

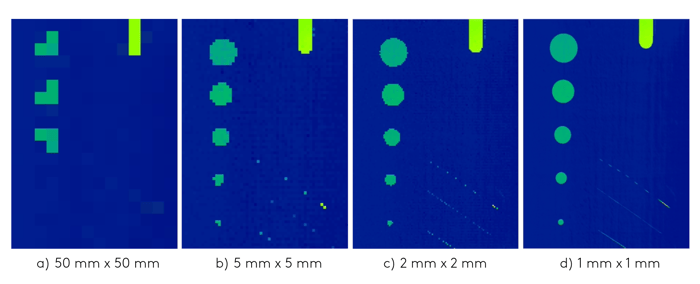
The automated solution can conduct high-resolution spot checks at 0.5 x 0.5 mm (0.02 x 0.02 in) intervals through to something as low as 50 x 50 mm (2 x 2 in). The resolution chosen is a compromise between the time allocated to conduct the inspection and the largest discontinuity the asset owner is willing to miss. Alternatively, a fast-coarse scan on a low resolution could be conducted first to find the areas of interest followed by high-resolution scans. Of course, the inspection time can be reduced by only targeting areas of the asset that are normally associated with corrosion, e.g. the product interface level in a storage tank.

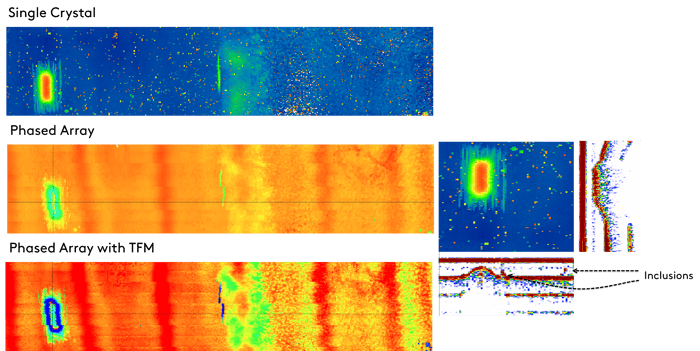
Phased array ultrasonic testing (PAUT) extends on the regular spot measurement of the single crystal method by using an array of N ultrasonic transducers (or elements). Through electronic scanning of these elements, a wider scan area can be acquired as opposed to the standard single element. When the probe is swept, a strip of measurements is created. With minimal overlap, far less raster sweeps of the probe are required to cover the same area as that of a single crystal probe. Using the crawler with a PAUT probe and one of the self-contained Mantis™ and Cypher® units incorporating the ultrasonic pulser, data storage, and multi-touch display with a workflow user interface, can drastically improve the efficiency of each scan. For example, a 1000 mm (39 in) long, 600 mm (24 in) wide scan with a high measurement resolution of 1 x 1 mm (0.04 x 0.04 in), a raster scan with a single crystal probe would take around 27 minutes to complete. With a wider probe, less sweeps, and at the same measurement resolution, coupled with a PAUT probe would take between 1.5 & 2 minutes (Depending on probe orientation); a 13 to 18x improvement in corrosion mapping efficiency.
In addition to standard PAUT, the Cypher and Mantis can perform total focusing method (TFM) when corrosion mapping to further elevate the quality of the reported indications by synthetically focusing all points under the array of the probe. For each probe position, an element in the array is fired once and all elements listen for reflections. This is repeated for each element resulting in a collection of N B-Scans. Through the TFM method, an image is constructed by summing specific points from each of the B-Scans to give a focused, “cross-sectional like” representation of the component under the array. This leads to better defect representations, more intuitive analysis, and faster inspection. This can be conducted in real-time on the Mantis, Gekko, and TOPAZ to deliver reportable results directly to the inspector with the same mapping efficiency as standard PAUT. One example benefit of TFM for corrosion mapping is the presentation of the defect shape. For example, a dome-end like corrosion area on the far side of an inspection sample can have reflectors at an incident angle greater than 45°. For the single crystal approach, the sound would not reflect to the probe location and so the roll-off of the defect would show severely reduced amplitude. With an array probe and with the TFM approach, the width of the probe would result in further elements detecting the 45° reflections resulting in a holistic representation of the corrosion profile.

For over a decade, Eddyfi Technologies has been at the forefront of corrosion mapping, offering instruments that continually enhance efficiency and imaging. Say goodbye to the waiting game and embrace the health check for your structures. Start now by visiting the Eddyfi eStore and Academy to explore our solutions tailored to your needs.


