Now compatible with Panther, Capture acquisition software is the most powerful phased array ultrasonic testing (PAUT) and total focusing method (TFM) desktop system. Advanced yet user-friendly, the UT software offers both PAUT and TFM solutions at industrial scan speeds while respecting code compliance.
Designed for all levels of technicians, Capture has earned its reputation as the complete software platform designed for all UT, PAUT, time-of-flight diffraction (TOFD), TFM, and adaptive TFM procedures (ATFM). Combining the speed required for industrial integrated PAUT solutions, with the most complete set of TFM imaging techniques, Capture 4.0 makes the Panther the ultimate tool for R&D and procedure qualification.
No different from previous software updates, it continues to offer a balance between new tools and features requested by customers while improving ergonomics to increase productivity and probability of detection. Let’s take a closer look.
Analysis
In Capture 3.1, a tool was introduced that allows automatic sizing of the defect based on a decibel drop method. The operator selects the decibel level -6 dB, -12 dB, etc., along the scan and index axis, circles the indication, and Capture automatically measures the dimensions of the defect along both directions. With Capture 4.0, the analysis goes a step further offering an assisted analysis module dedicated to butt weld inspection with PAUT. The aim of this feature is to increase analysis productivity by providing automatic detection, filtering and classifying indications based on standards before acceptance by the operator. The feature is available for butt weld, V and X bevels, and for inspections carried out on both sides of the weld.
Quality requirements for welded joints are mainly associated with the material, welding process, and service conditions. Testing levels are typically associated with these requirements as described in ISO 13588. Indications can be evaluated by measuring the length and height or the length and amplitude. The assisted analysis module is based on the latter. Recordings and evaluation levels are decided by the operator; by default, they are based on ISO 19285 for a time-corrected gain (TCG) performed on side-drilled holes.
Then, the assisted analysis tries to classify indications based on different pre-selected categories or defect types (defined in ISO 6520) in function of the indication reflectivity and position in the weld. The algorithm automatically fills the table of indications with the associated classification when successful. When the algorithm is unable to classify the indication, it still indicates to the operator that this is a potential defect. At the end, the operator remains responsible for modifying, completing, accepting, or rejecting the results. To facilitate his or her job, the analysis workflow for the acceptance criteria has been improved to make it more user friendly.
Advanced TFM
Eddyfi Technologies was the first NDT manufacturer to provide a portable PAUT unit with TFM capabilities.
In Capture 3.1 we introduced plane wave imaging (PWI), a code compliant technique for TFM that offers scanning speeds of over 100 millimeters (1 inch) per second, which had no competition. Multigroup and multiprobe was made available for TFM allowing inspectors to perform weld inspection from both sides of the weld at the same time while combining up to four different modes. Capture 4.0 combines the two by making PWI compatible with indirect modes allowing operators to use a mix of up to four modes on various probes while keeping industrial scanning speeds.
Capture 4.0 introduces three additional modes: 5L, 5T, and LLT.
-
5L can be used to collect images of vertical surface defects for specific applications (high-density polyethylene or HDPE for which shear waves don’t propagate)
-
5T is useful for detecting and sizing defects located along the outer diameter (OD) surface
-
LLT can display vertical defects in the middle of a sample.
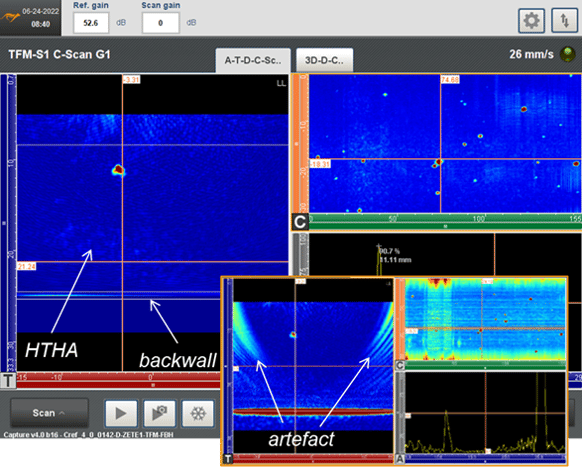
Normal incidence TFM inspections sometimes have artifact echoes that can hide small defects. These artifacts are a result of information coming from the backwall. Signal-to-noise ratio (SNR) can be improved by adjusting the range of the FMC A-scans for TFM. The 4.0 update allows operators to adjust that range to reduce the influence of the artifacts. The following image shows an example for a high temperature hydrogen attack (HTHA) inspection. The artifacts visible in the bottom image are removed when adjusting the range of the FMC data allowing visualization of the low amplitude HTHA data.
Platform
Panther is designed for both desktop and industrial applications, offering unparalleled performance in a compact unit. Accompanying software, Acquire, provides advanced configurations, 3D CAD files, anisotropic materials, complex 2D PAUT probes, and a full software development kit (SDK). With Capture 4.0, it is now possible to combine the easy-to-use interface of Capture with the advanced hardware capabilities of the Panther.
- Use up to four TFM groups each with up to 1 million pixels. As calculation is done by the graphic card of the PC, the upgradability is guaranteed in the future by simply changing for a more powerful GPU.
- The high data throughput of the Panther allows customers to record the FMC dataset for post-processing at a decent scanning speed.
- Use the full aperture of probes with up to 128 elements for both PAUT and TFM techniques.
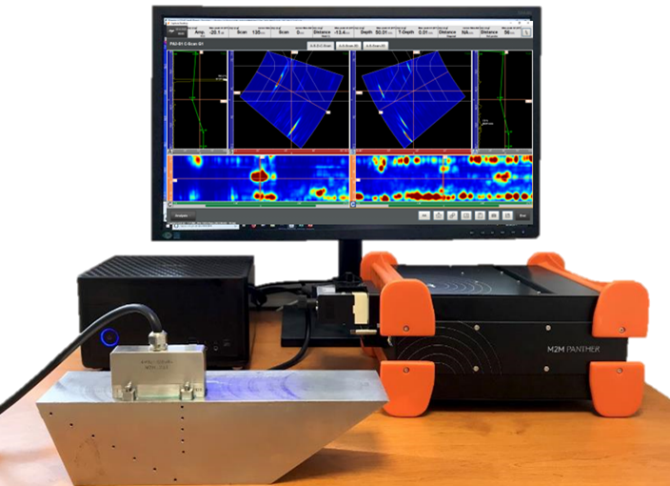
Customers can now choose between various software solutions with the Panther based on the level of complexity of their applications while benefiting from high hardware performance.
Your Requests and Improved Ergonomics
Your feedback is so important to us, and the following features in Capture 4.0 continue to address your requests. Let us know what you think here.
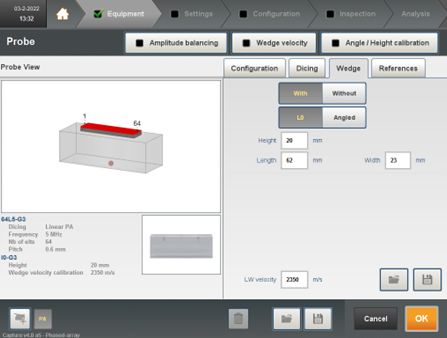
Probe assistants (amplitude balancing, wedge velocity, and angle/height calibration) are available at all times in the probe panel allowing quick access and to see which of them have been done. Wedge delay calibration is now available for L0° wedges providing automatic height measurement. This is useful when dealing with wedges with a water column concept like the LYNCS™.
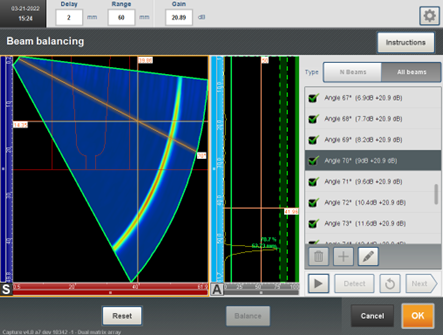
“All beams” balancing mode is now available and allows sensitivity correction for all angles. This feature is an extension of the beam balancing that was only available for select angles. This is typically used when dealing with dual linear arrays (DLA) or dual matrix arrays (DMA) for stainless steel inspections for which there could be a big difference of sensitivity between defects located at the top and bottom of the weld. This feature can also be used for corrosion mapping/composite inspections to equilibrate the sensitivity between the various sequences of a linear scan.
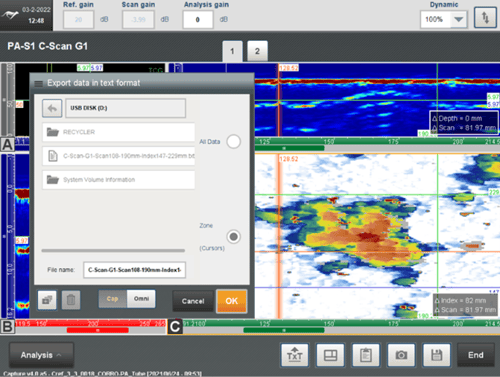
It is now possible to export a partial area of a C-scan drawn by the measurement and reference cursors as a .csv file. This allows customers to focus on corroded areas rather than export the entire C-scan.
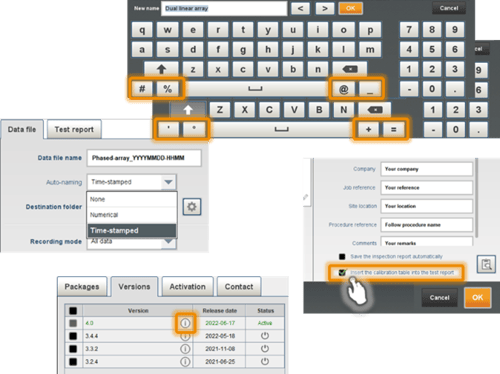
Capture 4.0 also brings many ergonomic improvements as well as the addition of all Zetec libraries of probes and scanners. Procedures often require formality in file naming or specific content in the report. Characters have been added to the virtual keyboard, the date can be added automatically to the file name, and the element check can be added to the report. Views have also been optimized in full screen mode.
Capture 4.0 offers a great mix of new features with an assisted analysis module that improves customers butt weld inspection productivity, new TFM modes compatible with PWI, and compatibility with the Panther for better performance. For more information on Capture™ software and our advanced PAUT and TFM offering, contact our experts today!


