Encoded phased array ultrasonic testing (PAUT) technology can be a reliable and efficient alternative to radiography for boiler tube weld examination. However, several challenges arise when attempting to perform inspections in the tight environment inside of a boiler. The major concern with boiler tubes is the low clearance between pipes. The other complexity is the small wall thickness of the pipes, combined with a variety of diameters, and the presence of the weld caps. To tackle the challenges listed above, a complete phased array UT inspection solution requires both low-profile PAUT probes and wedges, and a low-profile scanner.
Check out the applications solution brochure here.
Boiler Tube Inspection Equipment
NDT Scanner
The right scanner can be adapted to different pipe diameters ranging from 0.5 to 4 inches NPS (21.4 to 114.3 millimeters OD). Consequently, manual inspections can be performed with higher precision and reproducibility, improving Probability of Detection (POD). The scanner allows single-sided and double-sided inspections depending on access to the weld (elbow, etc.).
 Figure 1: With its 11mm clearance and encoded circumferential movement, the low-profile scanner enables rapid and efficient inspections of small diameter pipe butt welds.
Phased Array Probes
To fully benefit from the low clearance scanner, Eddyfi Technologies offers an application specific set of probes and wedges. With frequencies ranging from 5 to 10 MHz and options for 16 or 32 elements, the extra thin A15 linear array probes allow maximum detection capability. The arrays are curved to optimize focusing on thin tubes, and the wedges are designed to reduce the distance to the weld center, allowing for better coverage of the examination volume. Wedges must be adapted to the curvature of the scanning surface and comply with corresponding standards (ISO 17640, for example).
 Figure 2: Case dimensions of the low-profile PAUT probes.
Another technique used for the inspection of boiler tubes is Time of Flight Diffraction (TOFD). In TOFD, a pair of ultrasonic probes are placed on opposite sides of the weld with one probe acting as a transmitter and the second as a receiver. When a discontinuity such as a crack is present, there is a diffraction of the ultrasonic sound wave from the top and bottom tips of the crack. Using the measured time of flight of the pulse, the depth of the crack tips can be calculated automatically by trigonometry application. When it comes to boiler tube inspection, the same constraint is applied to TOFD probes; it is thus necessary to use low-profile TOFD probes. LIMBOTOFD probes are low-profile TOFD probes with a 10mm clearance providing easy access between tube gaps. LIMBOTOFD probes use 3mm active elements at 10 and 15 MHz, providing complete coverage of typical welds encountered in boiler tubes. LIMBOTOFD probes have an integrated wedge that provides perfect coupling, suitable for various standard pipe diameters, and are compatible with the low-profile scanner described before.

Figure 3: Dimensions of the LIMBOTOFD PAUT probes.
Phased Array UT Systems
When it comes to boiler tube inspection and thin wall inspection in general, one can follow the ISO 20601 standard that specifies the application of phased array technology to steel parts with thickness values between 3.2 and 8 millimeters. Like many welds, the testing volume should include the weld and the heat affected zone. When performing a line scan, i.e., a sectorial scan for a fixed index position, a two-sided inspection must be carried out. If the evaluation of the discontinuities is based on amplitude only, the deviation of the beam direction from the normal to the weld bevel shall not exceed 6°.
.jpg?width=500&height=375&name=Boiler%20Tube%20inspection%20%C2%A9M2M%20China%20(1).jpg)
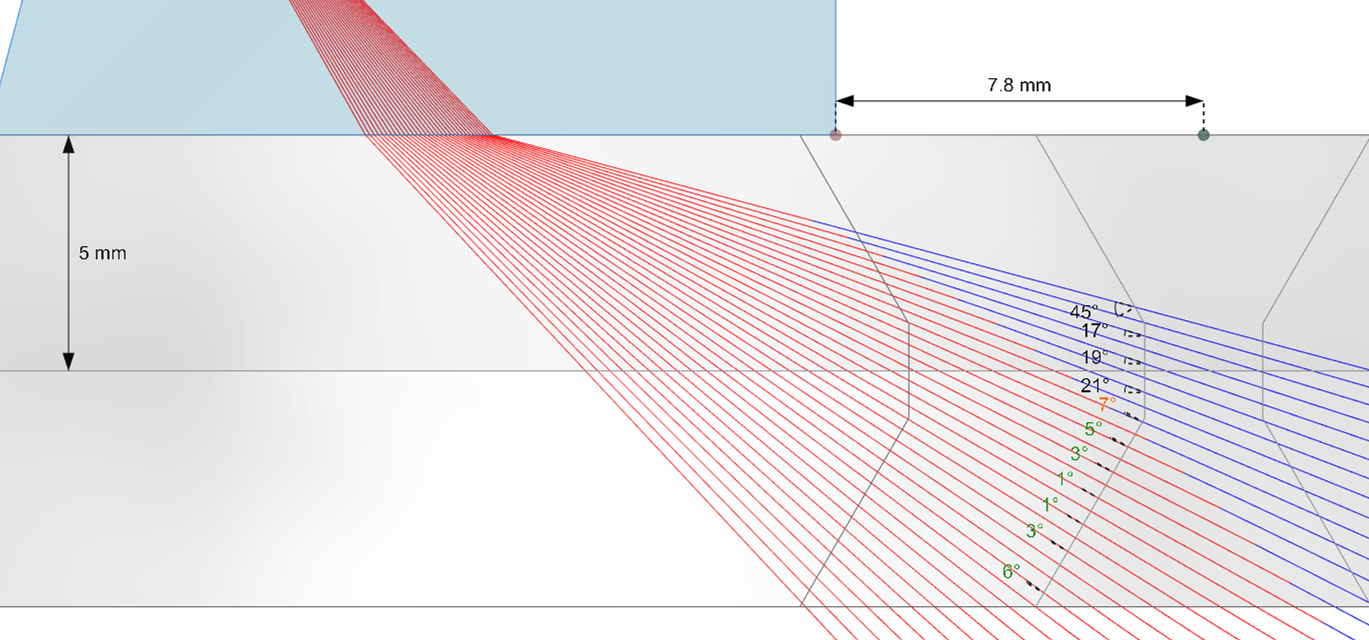
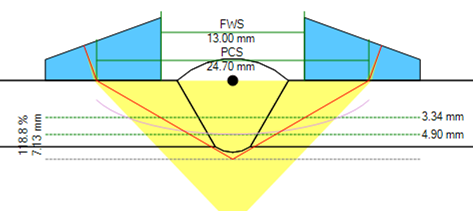
For encoded scanning, a scan plan is essential and mandatory. It is thus important to use software that provides the ability to visualize the coverage of the inspection but also the angles with respect to the weld bevel. Embedded software offers this ability onboard the instrument. The following images show the scan plan designed to inspect a 5mm boiler tube using a 5L16-A15-8X10-2.5-IPEX low-profile PAUT probe. The probe is set to an index offset of 7.8mm to maximize the orthogonality of the beams with the bevel on the second leg. The angles indicated in green show the beams that are within 6° of orthogonality; this allows operators to quickly find the right position the probe along the index axis. This scan plan also provides near-field information (rays in red), allowing inspectors to focus the energy along the active plane to detect smaller indications and see if techniques like Total Focusing Method (TFM) of Phase Coherence Imaging (PCI) could be used with the current setup.

A scan plan is also necessary when dealing with LIMODOTOFD probes to ensure complete coverage of the weld and the heat-affected zone.

Eddyfi Technologies provides several PAUT instruments compatible with boiler tube inspection. While Cypher® offers the most capabilities, Mantis™ is the most economical solution that offers multigroup capabilities for double-sided PAUT inspection and TOFD.
Discover easily the most advanced portable PAUT instrument here.
Boiler Tube Inspection Results
PAUT and TOFD detects all weld defect types, but is better suited for planar defects:
- lack of root fusion
- lack of root penetration
- weld toe crack
- weld root crack
RT is better suited for volumetric defect types:
- porosity
- inclusion
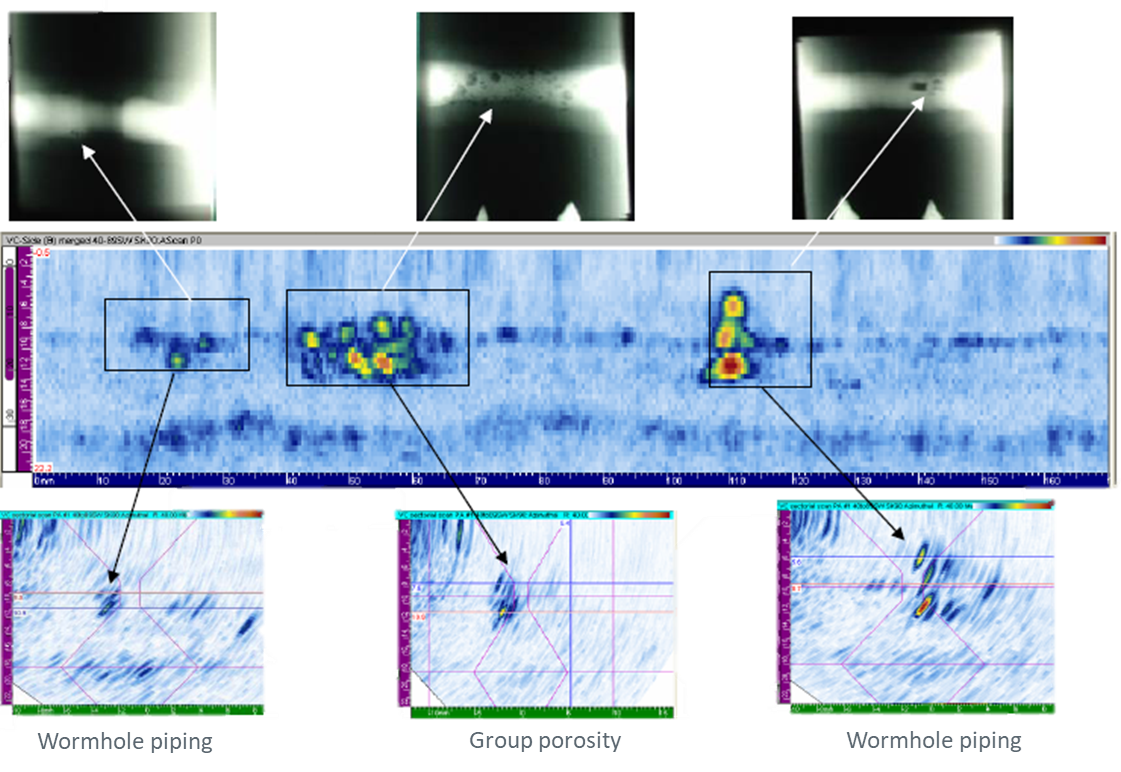
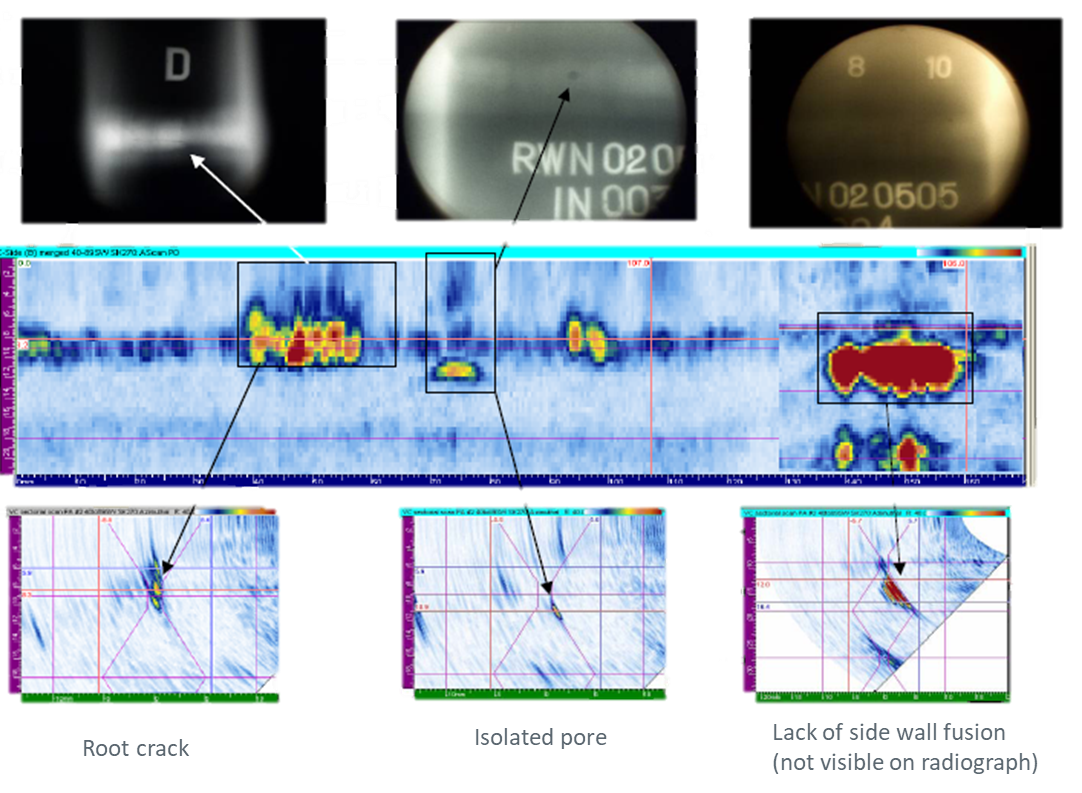
The following images show comparisons between phased array ultrasonic testing and radiographic testing data.


Courtesy of RWE Power Intl. Ltd.
Boiler tube inspection, when performed dual sided, offers the use of the assisted analysis tool. This feature increases analysis productivity by automatically detecting, filtering, and classifying indications based on standards before acceptance by the operator. The feature is available for butt weld, V, and X bevels, as well as for inspections carried out on both sides of the weld. Check out this Coffee Break with Eddyfi Technologies to learn more.
Quality requirements for welded joints primarily relate to the material, welding process, and service conditions. These requirements determine the testing levels, usually outlined in ISO 13588. To evaluate indications, measurements of length and height or length and amplitude are used. The assisted analysis module is based on the latter. Operators decide on recording and evaluation levels, with boiler tubes typically following ISO 20601 for time-corrected gain (TCG) conducted on side-drilled holes.
Next, the assisted analysis attempts to categorize indications into predefined categories or defect types (as defined in ISO 6520) based on their reflectivity and position in the weld. When successful, the algorithm automatically populates the indications table with the corresponding classification. If the algorithm cannot classify an indication, it alerts the operator that it may be a potential defect. Ultimately, the operator retains responsibility for modifying, completing, accepting, or rejecting the results. To simplify this process, the analysis workflow for acceptance criteria has been enhanced for greater user-friendliness.
The following video shows the tool applied to the analysis of a boiler tube PAUT inspection.
Conclusion
In conclusion, phased array UT technology offers effective detection of all defect types and provides through-wall sizing capability. Unlike radiographic testing, phased array UT inspections are non-disruptive to other activities. With Eddyfi Technologies' solution, boiler tube welds can be inspected from two sides in less than 1 minute, accommodating tube diameters from 0.5- to 4-inch NPS. The onboard software ensure an efficient inspection workflow, from setup to analysis and reporting. Visit the Eddyfi eStore for all your phased array UT needs and contact us to learn more about our advanced non-destructive testing solutions, offering repeatable, actionable, meaningful, and preventive data results that go Beyond Current standards.


