Corrosion under insulation (CUI) is external corrosion that develops on insulated piping or vessels when moisture penetrates the insulation and stays trapped against the metal surface. CUI is difficult to manage because insulation hides the damage until wall loss becomes severe, so inspections often rely on screening methods that minimize insulation removal.
This article summarizes seven common CUI inspection approaches and explains what each method can and cannot tell you. The three radiography variants (RTR, computed radiography, and digital detector arrays) are listed separately because their field constraints and outputs differ in practice.
Use this page as a selection guide: start with the method that matches your access constraints and the type of corrosion you expect (general wall loss vs localized pitting), then confirm findings with a targeted follow-up method when needed.
Definition: What Is Corrosion Under Insulation (CUI)?
CUI is corrosion that forms on the outside surface of insulated components when moisture enters the insulation system and remains in contact with the metal. Because the insulation and jacketing conceal early damage, CUI can progress unnoticed until leakage occurs.
Why CUI Is Hard to Detect
Removing insulation provides direct access, but it is expensive and operationally disruptive. Screening methods that work through insulation reduce cost and downtime, but they trade off accuracy, coverage, or sensitivity to localized pitting, so method selection is always condition-dependent.

The 7 Most Common CUI Inspection Methods (Pros, Cons, Best Use)
No single method covers every CUI scenario. The most effective programs combine at least one screening method with a confirmatory method when indications are found.
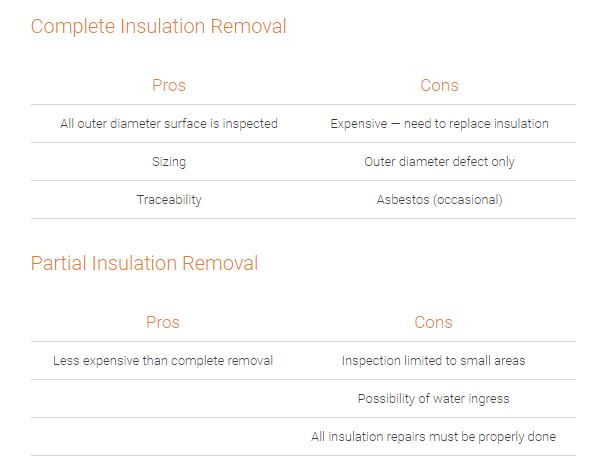
Visual Inspection (Full Insulation Removal)
Best for: direct confirmation of corrosion morphology and extent once the OD is exposed.
Limits: highest cost and longest duration. Logistics may involve asbestos and operational complications, especially if piping is in service.
Output: direct visual evidence and traceable documentation of surface condition.
Practical note: portable visual scanners can improve traceability and sizing of surface corrosion at the outer diameter.
There are two basic types of visual inspection:
Wet Insulation Detection (Neutron-based Moisture Screening)
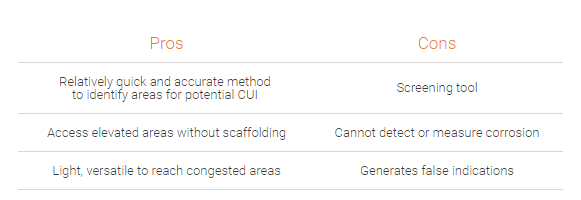
This is a screening tool designed to detect wet insulation, which increases the probability of CUI. A radioactive source emits high-energy neutrons into the insulation, and moisture attenuates neutron energy through interactions with hydrogen. The detector displays a low-energy neutron count proportional to the amount of water in the insulation.
Best for: rapidly ranking areas by moisture risk without removing insulation.
Limits: moisture is a risk indicator, not a wall-loss measurement. Confirm wall condition where moisture is high.
X-Rays or Radiography to Detect CUI
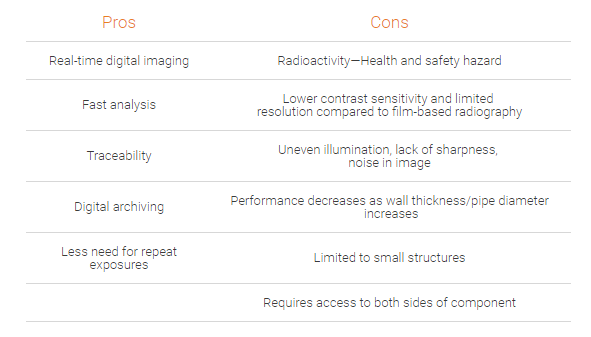
Real-time Radiography (RTR)
Best for: viewing outer diameter (OD) profile changes through insulation in real time when you have access to both sides.
Limits: thickness cannot be measured and correlating OD profile change to true wall loss is difficult. Limited to small structures and requires access to both sides.
Output: OD profile indications that may suggest corrosion buildup.
Computed Radiography (CR)
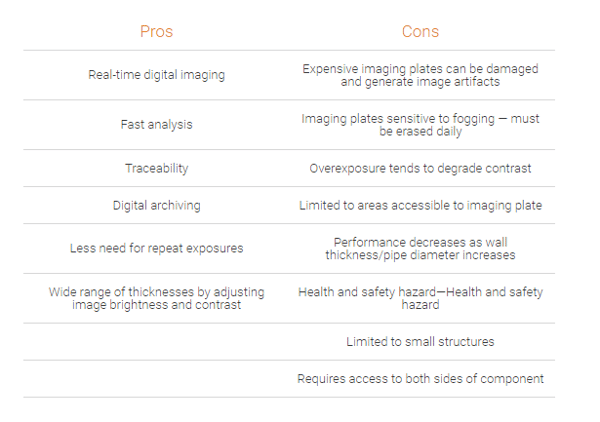
Best for: radiography using an imaging plate that is scanned into a digital image, enabling software enhancement (contrast, brightness, filtration, zoom).
Limits: radiography controls and access constraints still apply, and field logistics can be heavy compared to non-radiation screening.
Output: digital images produced by scanning the exposed imaging plate.
Digital Detector Arrays (DDA, Flat-panel Detectors)
Best for: faster digital radiography that is more sensitive than film, with potential dose reduction for a given image quality.
Limits: still a radiography method, so safety, access, and operational constraints apply.
Output: digital images with lower distortion and faster acquisition than film.
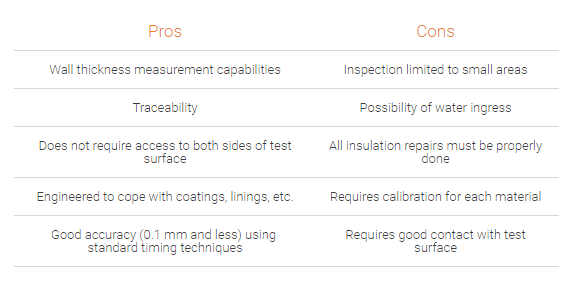
Ultrasonic Thickness Testing Through Insulation Plugs
Ultrasonic thickness testing measures local wall thickness using ultrasound time-of-flight, typically with a handheld thickness gauge.
Best for: spot measurements at selected locations when you can cut and properly reseal insulation plugs.
Limits: limited coverage. Cutting enough plugs for reliable results can be expensive and impractical, and poor reinstatement can compromise the insulation system.
Output: point thickness readings, not a full map.
Pulsed Eddy Current (PEC) Screening Through Insulation
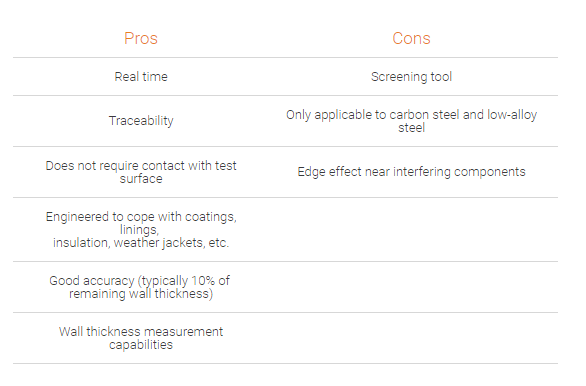
Pulsed Eddy Current is an electromagnetic screening method that estimates wall thickness through insulation by analyzing how induced eddy currents decay over time. A probe placed on the insulated surface generates a magnetic field that penetrates the cladding and magnetizes the pipe wall, then the decay response is used to infer wall condition.
Best for: screening for general wall loss over relatively large areas without removing insulation.
Limits: PEC averages thickness over a relatively large footprint, so isolated pitting defects cannot be detected. Treat PEC as a screening tool and confirm critical locations with another method.
Output: estimated wall condition over an area, not pinpoint sizing of small pits.
When to Use Which CUI Inspection Method (Fast Decision Table)
| Your constraint or goal | Start with | Then confirm with | Why |
|---|---|---|---|
| You can remove insulation and need definitive confirmation | Visual inspection | UT spot readings as needed | Direct OD access gives the clearest evidence |
| You need fast risk ranking without removal | Neutron moisture screening | UT plugs or targeted insulation removal | Moisture indicates probability, not wall loss |
| You have radiography capability and two-side access | RTR, CR, or DDA | UT at selected points | Radiography can show profile change but not thickness |
| You can only do limited spot checks | UT through plugs | Expand plug locations or add PEC screening | Spot readings do not equal coverage |
| You need broad screening through insulation | PEC | UT or targeted insulation removal | PEC is strong for general wall loss, not isolated pitting |
Key Takeaways
- No single CUI method is sufficient in every case, so effective programs combine screening with confirmatory inspection.
- Methods that avoid insulation removal reduce cost, but usually trade off accuracy or sensitivity to localized pitting, so selection must match the corrosion mechanism and risk.
- Document the decision logic (why this method, what follow-up) so results remain repeatable across sites and crews.
If you want help selecting a practical CUI inspection strategy for your constraints (access, jacketing type, operating temperature, and expected corrosion type), contact our team using the form below.
FAQ: Corrosion Under Insulation Inspection
What Is Corrosion Under Insulation?
CUI is external corrosion that develops on insulated piping or vessels when moisture penetrates the insulation and stays trapped against the metal surface. Because insulation hides early damage, CUI can progress unnoticed until leakage occurs.
Why Is CUI Difficult to Detect Early?
Insulation and jacketing conceal corrosion, and removing insulation is expensive and disruptive. Screening methods reduce cost but trade off precision or sensitivity to localized pitting.
Is Wet Insulation Proof That CUI Is Present?
No. Neutron moisture screening indicates wet insulation, which increases CUI probability, but it does not measure wall loss. Confirm wall condition where moisture is high.
What Is the Practical Difference Between RTR, CR, and DDA?
RTR provides real-time viewing of OD profile change, CR uses an imaging plate that is scanned into a digital image, and DDA uses flat-panel digital detectors that are sensitive and fast.
Can Radiography Measure Wall Thickness Under Insulation?
Not reliably in this context. RTR can show OD profile change, but correlating profile to true wall loss is difficult and thickness is not directly measured.
Why Is UT Thickness Testing Through Plugs Often Insufficient by Itself?
UT thickness provides accurate point readings, but coverage is limited. Cutting enough plugs to get reliable results is expensive and impractical, and poor reinstatement can compromise the insulation system.
Is PEC a Sizing Method for Pitting?
No. PEC averages thickness over a large footprint, so isolated pitting defects cannot be detected. Treat PEC as a screening tool and confirm critical areas with another method.


