Pipeline failure resulting from localized corrosion can have severe consequences across various aspects. Economically, it can lead to significant financial losses for pipeline operators due to product loss and supply chain disruptions. Environmental impacts are a major concern, as pipeline failures can result in spills and leaks of hazardous substances, causing pollution and long-term ecological damage. Safety risks arise from the potential for fires, explosions, and health hazards to nearby communities and workers. Infrastructure damage can occur, affecting surrounding structures and requiring costly repairs. Legal and regulatory consequences, reputational damage, and loss of stakeholder confidence further compound the effects of pipeline failure. To mitigate these consequences, robust corrosion monitoring, maintenance programs, and proactive measures are essential for preventing pipeline failures and ensuring environmental safety and public trust.
Sparse ultrasonic thickness checks have long been used to assess pipeline integrity. This method involves taking discrete measurements at specific locations along the length of the pipeline, often at cardinal points around the circumference. While this process can provide valuable information about localized corrosion or thinning, it falls short of providing a comprehensive understanding of the pipeline's overall condition. The intermittent nature of this approach increases the risk of missing critical areas of concern, leaving potential threats undetected.
Magneto-tools with the Sonyks™ guided wave inspection system has commercially opened up medium-range ultrasonic testing (MRUT), emerging as a gamechanger in pipeline inspection. This advanced technique employs ultrasonic guided waves above 100kHz that propagate along the length of the pipe, allowing for high-resolution and efficient monitoring with 100% coverage. By utilizing the inherent properties of the pipeline itself, medium frequency guided wave testing can detect and locate defects, corrosion, and other anomalies over long distances from a single tool position. This method offers a holistic assessment of the pipeline's integrity, significantly reducing the risk of oversight.
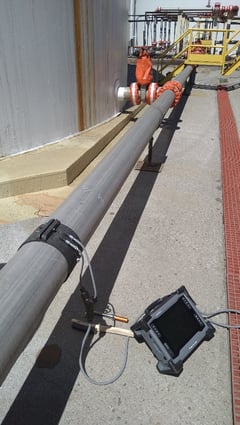
A recent client inquiry about the Sonyks system led to an onsite demonstration of the technology. The client wanted to explore the option of replacing sparse ultrasonic thickness testing with something more effective in targeting local metal loss on tank farm pipework transmitting sulfuric acid to an outlet nearby. If there are process issues upstream that affect the purity of the acid, then the risk of local metal loss within the pipe bore is elevated. To mitigate this risk, a more comprehensive corrosion inspection strategy is needed. Figure 1 shows a 20.32-centimeter (8-inch) Magneto-tool with a center frequency of 128kHz on one of the pipe sections at the tank farm.

Figure 1: Sonyks system screening a 20.32-cm (8-in) stainless steel pipe section carrying sulfuric acid
Medium frequency guided wave testing offers several distinct advantages over traditional sparse ultrasonic thickness checks. First, it provides comprehensive screening coverage, detecting geometric features and corrosion along the entire length of the pipe section, and it is especially useful in providing coverage for inaccessible areas. Using the Magneto-tools with the Sonyks instrument ensures a more targeted assessment of the pipeline's condition, enabling proactive maintenance and preventing costly surprises. Moreover, MRUT is non-destructive, minimizing operational disruptions and allowing inspections to be conducted while the pipeline is in service. This feature reduces downtime, maximizes operational efficiency, and minimizes the impact on production schedules. You can’t beat that!
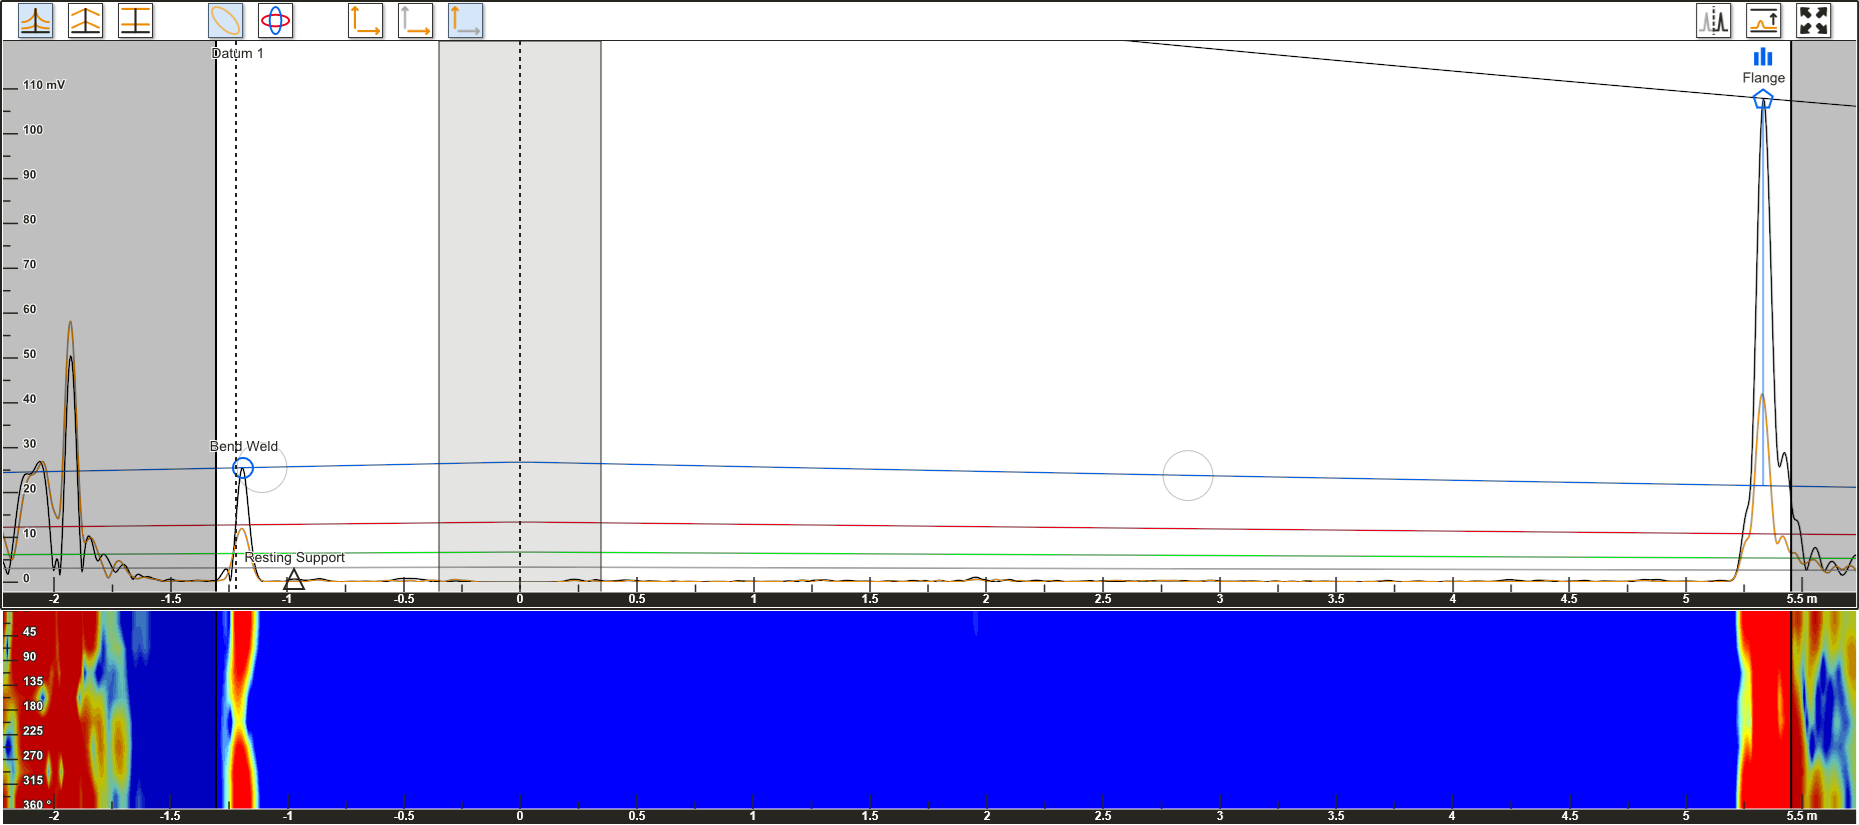
The Magneto-tools provide screening results with significantly lower noise compared to other tools available on the market. To illustrate this, Figure 2 displays an A-scan and C-scan from one of the pipe sections chosen for the client demonstration. The scan effectively identifies the tool and determines the position of the dead zone, represented by the grey region centered at the 0m position on the x-axis. The responses measured behind the tool are situated to the left of its position, while everything to the right is considered as forwards.
In the backward direction, the scan identifies a bend weld, which is highlighted as a notable feature. The distance amplitude curve (DAC) for this weld should be set at -14dB, considering the weld cap as a 20% reflector. On the other hand, the feature in the forward direction, located slightly over 5m, corresponds to a slip-on flange. This flange is set as a 0dB feature, indicating a 100% reflector. However, it is important to exercise caution when setting the DACs for flanges due to the complex ultrasound interactions caused by their geometry.
In this specific case, the DAC setting in the forward direction was aided by adjusting the attenuation rate and level based on the DACs set using the bend weld in the backward scan. Despite the challenges posed by flanges, the results demonstrate a signal-to-noise ratio (SNR) in the range of 60dB, which is well below the technique’s noise line of 32dB.

Figure 2: An A-Scan of one of the flanged sections of pipe chosen for the demonstration
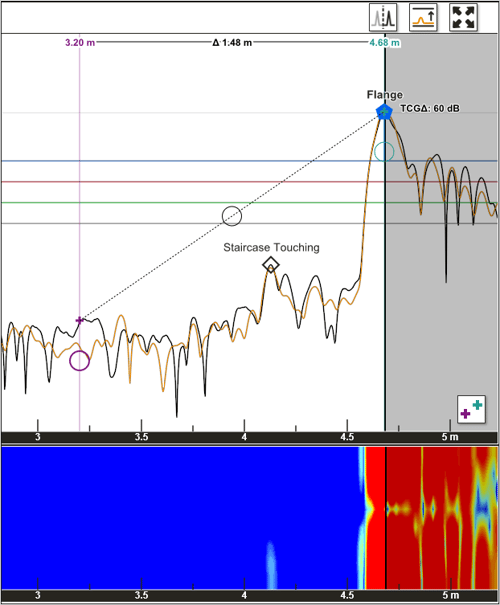
The high SNR exhibited by this guided wave testing (GWT) system means that responses from small defects that may have previously been undetectable, difficult to distinguish, or corrupted by coherent noise now have the potential to be identified. Fortunately, the scan shown in Figure 2 is free from any anomalies. Still, if local metal loss were ever to become a problem in this section, then it would be highlighted by Sonyks far earlier in a corrosion monitoring program than any other technique with unmatched screening coverage. Typically, the low noise performance of the Magneto-tools enables reliable detection of local metal loss representing less than 3% cross-sectional area. Interestingly, the only anomaly to report during the demonstration, other than regular geometric pipe features, was where the yellow access staircase (seen in Figure 1) had slight contact with the surface of the pipe. A contact condition like this causes a local change in the stiffness of the pipe wall, which in turn causes a reflection, as seen below in Figure 3. The image also shows the 60dB general noise level for the scan, which is incredibly low for guided wave testing. The contact of the staircase is not a defect in the traditional pipeline flaw sense. Still, the vibration of any pumps in the system or from regular use of the staircase could cause local metal loss over time.

Figure 3: Time-corrected gain (TCG) display of the A-scan and portion of the C-scan where contact of staircase caused a reflection
In summary, medium frequency guided wave testing can be employed to target local metal loss and assist pipeline operators in refining their corrosion mapping procedures. While guided wave testing is known for its ability to provide a broad assessment of pipeline integrity, it can also be used to focus on specific areas of interest, such as regions with known or suspected corrosion.
Incorporating guided wave testing alongside traditional techniques, such as sparse ultrasonic thickness checks, provides a more comprehensive corrosion mapping procedure. This combination of localized inspection with broader screening coverage using MRUT helps operators gain a detailed understanding of pipeline condition and therefore helps refine corrosion monitoring strategies.
Isn’t it time to take your pipeline inspection to the next level and experience the benefits of medium frequency guided wave testing? Visit our eStore for access to instant pricing, the Eddyfi Academy to learn more, and contact us when you’re ready for your own demo of Sonyks!


